
Knowledge Questions & Answers for In Ground Pools
Not sure which questions to ask when trying to learn more about On Ground Pools? Scroll Down to read through the questions and answers to learn most everything you’re going want to know about purchasing and installing an on ground pool.
Having a good basic foundation regarding in ground pools and their operation and installation is good information to have prior to making a purchasing decision. After reading the questions and answers below you should know that we are very knowledgeable with all of the products we sell. We are the Pro’s and we love to sell Pools.
The Questions & Answers are formatted almost verbatim as to how our customers have asked and we’ve answered for over the past twenty plus years. Note that during the construction and assembly process there may be other viable and correct methods for doing the steps.
- What is an In Ground Pool?
An in ground pool is a swimming pool that is assembled in a hole in the ground. The pool walls should be mostly or completely in the ground. However, there are instances where the pool wall is initially out of the ground but after assembly the wall is back filled to provide the needed support on the wall.
- When I received my pool liner, the drawing on the outside of the liner carton doesn’t look anything like the pool shape I signed off on. Is the liner made wrong?
The drawing on most of the liner cartons are generic and may not always apply to the liner in the carton. This doesn’t mean it is made wrong as it’s only a general depiction of the liner in the carton. All of the ProPools in ground pool liners are custom made for each pool sold and we require all liner drawings have a final approval by our customer prior to the manufacturing of said liner. In the event the liner is made correctly there is ‘this drawing’ which can be referred back to,
- What does the liner warranty cover?
As with all liner manufactures in the industry coverage only covers manufacturing defects. Liner warranty does not cover any labor or water.
- START HERE - START HERE
- Can the liner just lie on the ground inside the pool?
No. There is debris in the dirt which can puncture a hole in the liner due to the weight of the water and peoples feet pressing downward and twisting on the liner. For this reason a 2” bed of material should go under the entire liner. This material can be sand (for flat bottom pools) or something like a sand/cement mix or Pool Krete. Never use concrete as it has stones in the mix which can puncture the liner. See a swimming pool being installed with a Pool Krete Bottom.
- How are the liners made for on ground pools?
All of the on ground pool liners we sell are custom made to fit each pool and match the dig specifications that are agreed upon. Dig specifications are the dimensions which are used to dig out the bottom for the pool. These dimensions are directly related to the liner dimensions which will sit inside of the pool. There is usually no additional costs associated with changing any of the dig specifications for the pool prior to liner manufacturing.
- Can I use an above ground pool liner in an On Ground Pool?
No. On Ground pools use a liner with a specific type of bead on the liner which only works with the vinyl liner track which comes with the pool.
- How do I know what depths to dig the pool so the liner will fit?
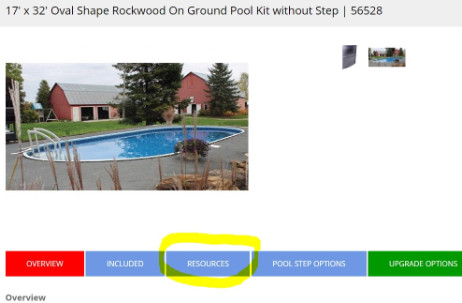
Each of the individual on ground pool size pages have tabs on them. When the tab labeled ‘Resources’ is clicked it will bring up a listing of PDF’s. Click on the ‘Panel Layout and Dig Specifications’ pdf, then scroll to find the size pool and set of dig specifications that you’d like.
Once the ‘Resources’ tab is clicked, it will look similar to the screenshot below.

It is possible to also modify the dig specifications on the site. Usually at no additional charge. - If I dig the pool first, can I then get a liner to fit how I’ve dug the pool?
Yes, though it is highly recommended that a pool bottom material other than just sand be put down while the liner is being manufactured. We recommend something like a Pool Krete or sand/cement mix bottom be installed under the liner. If it rains on an open pool bottom with no protective base material the rain and water run-off may cause the dirt to wash away, creating a channeling in the pool bottom as well be very muddy. If something like this should happen it usually can be remedied though it’s not always the easiest thing to do.
Once the walls are up it is good practice to put in the pool base material so that should a rain come the water will run across the bottom of the pool and collect in one general area. After the bottom base material is put in and it rains, the rain water can then be pumped out with some type of a sump pump. Generally a rain won’t impact how a Pool Krete or sand/cement bottom stands up over time. After a rain it is highly recommended to pump the water out as quickly as possible afterwards.
Once the pool base material has been put in the bottom of the pool the custom vinyl liner measurement form can then be filled out and sent to us so the liner can be manufactured. Liner manufacturing can take between 1 & 3 weeks to be delivered which is why we strive to have the bottom configuration already agreed to at the time the pool is purchased. This allows the liner to be manufactured and sent to arrive prior to the time in which the liner could be installed.
- Are there any risks in digging the pool for the liner first, then ordering it?
Yes and it is highly discouraged. Besides the inherent risk of having an open hole in the backyard which could cause personal injury should someone fall into it, rain may cause erosion to the soil which many times leads to the pool having to be dug again.
- Can I use anything other than sand under the liner?
Yes. We recommend either of the two methods below:
- A 2” Thick sand/cement mix is a great bottom to put in an above ground pool. It is semi-permanent concrete that will keep its form and consistency for years to come. This type of material allows for a perfectly smooth surface and when completed a pool pad can be put between the sand cement surface and the pool liner to create that ‘new carpet’ feeling of padding under the feet when walking. On ground pools do not require a pool pad nor pool cove. A pool cove is not required because the pool liners are custom made to fit the pool at 90 degree angle where the wall meets the floor.
For cost purposes it is possible to make your own sand/cement mix on the job. We use a ratio of 6 shovels of masonry sand to 1 shovel of Gray Portland cement in a rented paddle mixer. Using a paddle mixer will allow 2 – 3 loads of sand/cement mix to be made at one time.
- Pool Krete Premix is a quality blend of expanded vermiculite, Portland cement, and admixtures designed to be mixed with water and troweled to form a long-lasting hard bottom for on ground pools. The proper use of Pool Krete will enhance the quality of the pool installation and prolong the life of the vinyl liner.
Pool Krete is a porous but rigid liner base, which offers numerous benefits to both the pool installer and the pool owner. With no waste and minimal clean up, this professional approach to hard bottom installations result in greater customer satisfaction.
Never use a true concrete or any material with rocks in the base.
- A 2” Thick sand/cement mix is a great bottom to put in an above ground pool. It is semi-permanent concrete that will keep its form and consistency for years to come. This type of material allows for a perfectly smooth surface and when completed a pool pad can be put between the sand cement surface and the pool liner to create that ‘new carpet’ feeling of padding under the feet when walking. On ground pools do not require a pool pad nor pool cove. A pool cove is not required because the pool liners are custom made to fit the pool at 90 degree angle where the wall meets the floor.
- What do I use under the pool liner?
Below are the most common types of 2” material to put under a pool liner by bottom type (Flat Bottom vs. Contoured Bottom)
Flat Pool Bottom, Across the Entire Pool:- Sand – Sifted Sand (Playground Sand)
- A 2” Thick sand/cement mix is a great bottom to put in an above ground pool. It is semi-permanent concrete that will keep its form and consistency for years to come. This type of material allows for a perfectly smooth surface and when completed a pool pad can be put between the sand cement surface and the pool liner to create that ‘new carpet’ feeling of padding under the feet when walking. On ground pools do not require a pool pad nor pool cove. A pool cove is not required because the pool liners are custom made to fit the pool at 90 degree angle where the wall meets the floor.
For cost purposes it is possible to make your own sand/cement mix on the job. We use a ratio of 6 shovels of masonry sand to 1 shovel of Gray Portland cement in a rented paddle mixer. Using a paddle mixer will allow 2 – 3 loads of sand/cement mix to be made at one time.
- Pool Krete Premix is a quality blend of expanded vermiculite, Portland cement, and admixtures designed to be mixed with water and troweled to form a long-lasting hard bottom for on ground pools. The proper use of Pool Krete will enhance the quality of the pool installation and prolong the life of the vinyl liner.
Pool Krete is a porous but rigid liner base, which offers numerous benefits to both the pool installer and the pool owner. With no waste and minimal clean up, this professional approach to hard bottom installations result in greater customer satisfaction.
- Never use a true concrete or any material with rocks in the base.
- How much pool bottom material goes under the pool liner?
A minimum of 2” pool bottom base should utilized under the pool liner.
- If I want to make a sand and cement bottom to go under my liner, how do I do it?
A 2” Thick sand/cement mix is a great bottom to put in an above ground pool. It is semi-permanent concrete that will keep its form and consistency for years to come. This type of material allows for a perfectly smooth surface and when completed a pool pad can be put between the sand cement surface and the pool liner to create that ‘new carpet’ feeling of padding under the feet when walking. On ground pools do not require a pool pad nor pool cove. A pool cove is not required because the pool liners are custom made to fit the pool at 90 degree angle where the wall meets the floor.
For cost purposes it is possible to make your own sand/cement mix on the job. We use a ratio of 6 shovels of masonry sand to 1 shovel of Gray Portland cement in a rented paddle mixer. Using a paddle mixer will allow 2 – 3 loads of sand/cement mix to be made at one time.
- Does wall foam really help protect my liner?
Yes it does. There are times the pool wall is kicked or bumped by a swimmer causing the liner to press against the steel wall. Wall foam between the wall and liner softens blows such as these, reducing liner fatigue.
Wall foam also creates space between the liner and the wall allowing the liner to now lay up against what could be an abrasive metal object. - What different grades of pool liners do you offer?
There aren’t really different grades of pool liners, only different thicknesses. Thicker liners have a certain inherent increase in quality because of the thickness. The most common thicknesses of on ground pool liners today are 20 and 27 mil thicknesses. Of which we offer both.
Do not confuse above ground pool liner thickness which generally uses ‘gauge’ as a means to denote thickness with on ground pool liner thickness which uses ‘mil’ to denote thickness. Why? Liner ‘Gauge’ thickness is an arbitrary number by any manufacture but Liner ‘Mil’ thickness is a widely accepted international measurement of thickness. Gauge thickness cannot be measured with a tool. Mil thickness can be physically measured using a micrometer. Mil is the preferred method of denoting vinyl liner thickness in pools.
- Which direction is the liner unfolded to go into the pool?
Many of the pool liner manufactures have different methods for unfolding the liner once it’s taken out of the carton for installation. There usually is a label on the liner which shows which direction to unfold the liner once taken out of the carton. If you are never not sure please contact Propools and we can give instruction.
- Can I walk on the liner with it empty?
Yes. Of primary concern is to not walk on the liner with any type of shoe that could puncture the liner which is why we always recommend being barefoot when inside the pool. These greatly reduces the risk of puncturing the liner while walking on it.
- What should I be careful of when working inside the pool during the liner installation process?
When working inside the pool during the pool liner installation process one of the most important things is not to do anything that could put a hole in the liner. This would include things such as not wearing shoes inside the pool, not carrying objects which could puncture the pool. When the liner is in the pool, do not place objects on top of the pool wall which may puncture the liner if they fell into the pool.
- How far apart should the screws be when installing the vinyl liner track?
The self-tapping screws for the liner track should be approximately 12” apart with a screw within 1” of each end of the track.
- Do I have to have a screw near the end of the vinyl liner track?
Yes. One of the self-tapping screws should be placed within 1” of the end of the vinyl liner track.
- How does the liner stay in the liner track?
Pool liners which are made for a track have a ‘bead’ on them which will secure themselves into the track. As the liner comes out of the track it turns 90 degrees which then creates enough tension where the bead meets the track that it stays in place.
If the liner is too small for the pool and the liner is pulling away from the wall, the bead may not stay in the track. In these instances there is a product called ‘Liner Lock” which can be used to minimize the instances in which the liner bead comes out of the track. If you’re in a pinch a coin such as a nickel or quarter will provide the same purpose. If a coin or some other temporary non-puncturing item is used to hold the liner in the track is uses, it should be replaced with liner lock as time presents itself.
- The liner won’t stay in the liner track. What do I do?
If the liner is too small for the pool and the liner is pulling away from the wall, the bead may not stay in the track. In these instances there is a product called ‘Liner Lock” which can be used to minimize the instances in which the liner bead comes out of the track. If you’re in a pinch a coin such as a nickel or quarter will provide the same purpose. If a coin or some other temporary non-puncturing item is used to hold the liner in the track is uses, it should be replaced with liner lock as time presents itself.
- How can I tell if the liner is in the pool properly or ‘square’?
Some liners come with stickers on the corners to make it easier to install the liner. If there are no labels such as this on the liner to notate where a corner is, then once the liner is in the track all the way around the pool the liner seams should be visible to see. The corners or changes in the pool wall direction will usually have a seam. The seams should run straight up and down from the top edge of the liner to the floor.
In general when you look down upon the liner from outside the pool, the entire liner should take the shape of the pool. Even in the area where the liner is pulled away from the wall.
- Can I get the air out from behind the liner so it will start to lay down against the pool wall and entire floor?
Yes, a vacuum can be used to pull the air out from behind the liner which causes the liner to lay down flat against the wall and floor area. When this is done it apparent where the wrinkles are on the liner and which wrinkles need to be worked on.
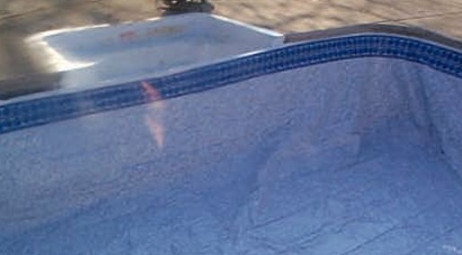
A lot of times a new liner when it’s first installed will look like the image below with wrinkles, not lying flat against the pool wall and floor, etc.
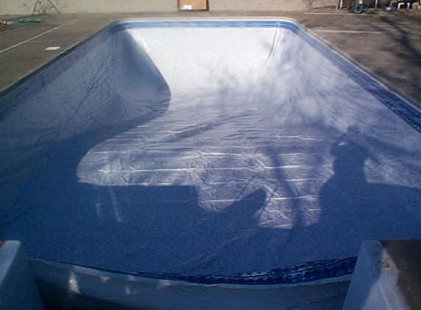
This process can be done with a specific vacuum called a liner vac or a standard 5 HP shop vac. All open areas of the liner edge should be sealed with a duct tape type material. Duct tape all openings of the skimmer lid. Tape around the step face where it meets the liner.
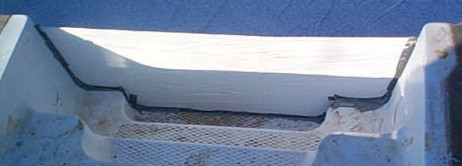
If any plumbing has been run make sure the far ends are taped closed or the valves are turned to a closed position. No need to worry about the main drain. All perimeter liner bead should be in the liner track or sealed where it is not in the track.
Any open areas around the liner bead will reduce the ability to create an air tight seal. Once all open areas around the liner area sealed, go to the wall at the beginning of the transition slope or middle of the pool for a flat bottom pool. Then carefully remove enough liner bead from the track to fit the vacuum hose behind the liner and almost all the way down to the pool floor. Do not place vacuum hose end on the pool floor. The vacuum hose should generally be about 3” – 9” above the bottom of the pool wall. Once this is done, tape around the hose where it goes behind the liner. Once this is all sealed, turn on the vacuum. You should be able to notice the liner being pulled back to the wall within the first 15 minutes. If you don’t then there is an air leak somewhere around the line which is not allowing it to pull back.
Image below shows same pool from above but with the liner vac pulling the air out from behind it. The liner vac should be left running until the water level is approximately 6” up the pool wall.
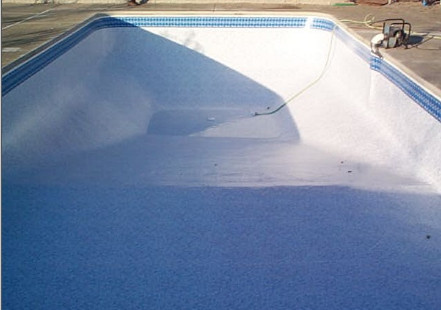
- There are wrinkles in my liner, is the liner to big?
Not necessarily. It is totally natural for the liner to have wrinkles when it is first put into a pool. A properly sized liner will almost always have wrinkles when it’s first installed but when it is full; all wrinkles should be gone.
- How do I get wrinkles out of the liner?
There is no one specific method of physically taking the wrinkles out of a liner. It’s really a matter of what works best for you. Though there are really only 3 methods of when to take out the wrinkles.
- Liner is in the pool and just sitting there
There are times when a liner is put in a pool and it fits almost perfect with only minor wrinkles which "pull themselves out" when the weight of the water is applied and the liner stretches.
- Liner is in the pool and a vacuum is used to suck the air out
Using a vacuum suck the air out from behind the liner. Be sure to seal with duct tape any openings around the pool that would prevent a good vacuum seal. As the liner gets pulled back against the wall and floors you will be able to see how the liner will ‘lay down’.
It is at this point which the wrinkles can be worked out by spreading the liner in small increments in any number of different directions depending upon how the wrinkle lies and the height of the wrinkle. Some wrinkles need to be slowly taken down over the course of a few feet of moving the wrinkle away and slowly making the wrinkle smaller and smaller until it disappears.
Once the wrinkles are out of the liner; leave the vacuum on until the pool has at least 12” of water in it. This will allow the weight of the water to hold the liner in place when the vacuum is taken off of the liner.- Liner is in the pool and pool is filling with water
Of the 3 methods, this can be the most difficult. It can be difficult because even an inch of water makes it very difficult to move the liner and slowly spread it out as described in step two above.
- This is an unwritten fourth method which is to do both #2 and #3 above at the same time. This process is really only for the pros because if you’re not quick about it the liner may get to much water on in and then you can’t move the liner any more.
- My liner does not sit down on the floor or against the walls in the area where the wall meets the floor, is the liner to small?
No. When a properly sized pool liner is first installed, it will not sit flat on the floor across the entire pool bottom. Additionally, the liner will not completely lay against the walls.
Liners are designed to be slightly smaller than the pool so they will form fit into and against the pool as the pool is filled with water. Having a gap at the bottom of the pool wall of 3” – 4” is not uncommon. By engineering and design, liners are made to 'stretch' into place.
- How does the liner get fitted around the step?
Liners aren’t really ‘fitted’ around the steps but rather they are ‘sandwiched’ in place around the step face as shown in the picture below.
Before putting the liner in the pool, there are two vertical strips and one horizontal strep on the face of the step. Each of these vertical strips have decorative pieces on them which are used to cover the screw heads as shown below.
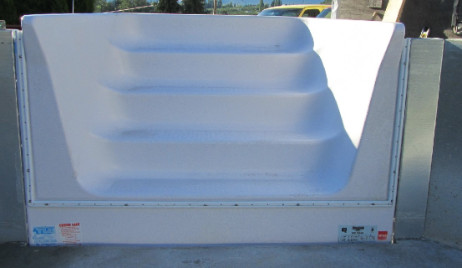
The decorative coverings should be removed from the step track by sliding them upwards or sideways depending upon which track you’re working on. Once the decorative cover has been removed, remove all of the screws from the step track. Very important that the removed step pieces be put back on the step in the exact same order as they were taken off. Once done, the step is ready for liner installation. When the liner is first installed in the pool, it should go across the front of the step as shown below.
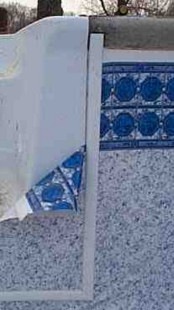
Once the water level is approximately 3” – 4” below the horizontal strip on the step and the liner is in its permanent position, secure the bottom step track back onto the step. Use hand tools only, no powered tools. Tighten only hand tight. Then do the same for the vertical track pieces if the liner is in its permanent position. Next, using a utility knife cut the liner on the inside part of the step track to expose the step as shown in the image below.
- Before installing the liner, do I need to do anything to the inside of the pool area?
Yes.
- The inside of the pool must be free of any dirt and/or debris which may puncture the liner. Even small rocks and pebbles can put a whole in the liner when combined with the weight of the water and someone stepping on top of it while enjoying the pool. We recommend sweeping everything to one spot in the deep end of the pool, then use a shop vac to get everything up and out of the pool.
- All wall joints should have 2 – 3 layers of duct tape on them to create a smooth surface for the liner to lie against.
- Make certain the pool bottom material has a flat smooth surface with no divots or rises in the material. These can be visible when the pool is full and may also be felt while walking barefoot in the pool, once it’s full of water.
- Make sure the face gaskets for the skimmer, main drain and return, etc. are in place. To help hold the gaskets in place a small dab of clear silicone sealant can be used to hold the gasket in place. Do not apply to entire gasket but only in small spots to hold gasket. Allow to dry for at least an hour before installing the liner.
- I noticed that during installation the liner got punctured. Can this be fixed?
It can be patched using vinyl liner patch material. Another option is to wait until the steps or other accessories have been “cut in place” and then use that material to patch the hole with. Adhesive from a swimming pool vinyl liner patch kit is recommended to use for any and all patches.
- When do I cut the liner for the step, skimmer, return, main drains and other accessories?
Cuts for pool accessories like steps, skimmer, returns, etc. should ONLY be done once the faceplate is securely put on the accessory creating a water tight seal.
- Can the pool be emptied and the liner cleaned each year before opening for the season?
Yes it can but this should not really be done. Why? Swimming pool liners are made with a petroleum product base and when they are emptied for a period of time, they will shrink. When filled again with water, they will not stretch back but tear.
- My pool liner has a leak. How can I find out where the leak is?
Though there is not an industry specific way to find a leak in a vinyl liner pool there are a few things which you can do. What we’re going to discuss are not the only ways to find the leak but a few simpler ones.
Water Level Check:
Turn the pump off and let the water level drop down. The leak will be somewhere close to the water edge. The water level should not ever be allowed to drop down below the return fitting in the wall. Look for any holes in the liner material or seams which may have separated in the liner.
In the event the water stops near or at the edge of or somewhere along the area of one of the pool fittings which passes through the liner; it is likely the leak is there. Check all areas of the liner along the water level for holes, punctures or seam separations. If none are found, fill the pool to its normal water level, then follow the Dye Testing steps below.
Dye Testing: (Do this with the pool at its normal full level of water.)
This will require some sort of liquid colored dye that is highly visible against the liner. Generally food coloring in a squeezable bottle will work. Also, Phenol Red from a water chemical test kit will work but it will end up ruining the Phenol Red so it will have to be replaced for future water testing.
Turn the pump off. Allow the water to stop moving by keeping the water undisturbed for about 30 minutes. This is usually done inside the pool. When entering the pool move slowly so as not to create a large disturbance and water movement.
First test around all of the connection fittings in the pool, such as skimmer and return face-plates. On the inside part of the face-plates the edge of the liner should be visible. When in the water, hold the dye bottle upside down. When testing hold the tip of the dye bottle approximately ¼” - ½” away from the area being bested.
- At the skimmer. Test the ‘joint’ where the face-plate ‘sandwiches’ the liner. Gently squirt some of the dye over the joint area. If there is a leak, the dye will be visible drawn to that location. Do not squirt too much dye as it will be too diffused in the water to tell if it is in fact leaking. Test the entire seam where the liner and gasket are sandwiched by the face plate.
- Do the same around the return and any other fittings which pass through the liner.
- Do the same around the return and any other fittings which pass through the liner.
- There are seams on the wall and floor of the liner. Check along all seams for areas which there may be a leak. In areas which may look like a leak, perform the dye test.
This Video shows the application of a dye material and it being drawn into a leak. Watch Video
- At the skimmer. Test the ‘joint’ where the face-plate ‘sandwiches’ the liner. Gently squirt some of the dye over the joint area. If there is a leak, the dye will be visible drawn to that location. Do not squirt too much dye as it will be too diffused in the water to tell if it is in fact leaking. Test the entire seam where the liner and gasket are sandwiched by the face plate.
- I would like to review the basic steps it takes for installing an on ground pool. Can you help me?
Yes we can. We have created a series of pages which goes through the key steps in installing an on ground pool. Click Here to start your journey.
- Who do I contact with installation questions on my pool?
With any installation questions regarding pool installation you can contact our customer support staff who is ready willing and able to assist you. There may be times where we need to bring the individual manufacturers into the conversation.
- Where do I find installation information for the pool I want to purchase?
To see all of the installation information for the items, navigate to the page which shows the model and size pool that you are interested in. Once the page loads, just below the main image there are several named tabs. Click on the ‘Resources’ tab and any applicable installation information will be listed and viewable as PDF’s.
- Can I install the pool myself?
Yes. If you are relatively handy, can follow written directions then putting an above ground pool together should not be that difficult. Of course if you’ve any questions along the way, you are more than welcome to give us a call and we’ll ‘walk you through it’.
Take a Photographic Journey of Pool Construction.
- Who do I contact for installing my pool?
If you’re looking for an installer you can certainly contact the local pool company/installer. However, these pools do not require any special training per se. Ie. Installer does not have to be a swimming pool company. There are many local ‘handymen’, general contractors, concrete companies, landscapers, etc. that install above ground pools. If you know of someone or have a friend who has had a pool installed you can always ask them.
There are also plenty of sources online that you can utilize for finding a competent installer. There are sites like the Facebook ‘Local Pages’, Google, Houzz, Angie’s List, Etc. which may be a good source for finding an installer.
- How clear does the ground need to be where I’m going to put the pool?
The ground should be free of all exposed roots, rocks and ground objects that have any sort of jagged edge or protrusion which may work their way up through the sand and puncture the liner.
- When planning on where to put my pool, what do I need to consider?
Pool Placement - The pool should not be placed over top of septic lines, phone, power or water lines. Pool should not be placed immediately underneath or beside overhead power lines.
See manufactures warnings for more specific information or contact the manufacture directly.
- How long does it take to assemble/install an on ground pool?
The time required to install an on ground pool can vary greatly by the time spent working on the project, weather and skills. Typical on ground pool installation for a ‘handy person’ is typically 3 weeks. A knowledgeable person with the help of two assistants can complete the project in about 4 days once the pool is dug.
- What type of electricity do I need for my pool equipment?
On ground pools should have a dedicated 20 amp breaker. Generally only 110/120 volt connections are all that are needed. Any in pool lighting should have a dedicated GFCI breaker for in pool lighting connections. Additionally any outdoor outlets should also be on a GFCI breaker.
Consult your equipment installation/users manuals for exact electricity requirements and proper wire sizing.
- Do I Need Pool Cove for my on ground pool?
No. Our on ground pool liners are made to fit at a 90 degree angle where the bottom of the wall meets the floor.
- Can the on ground pool walls sit on the ground?
Yes. They are made to sit on solid undisturbed earth, not fill dirt. It is also a benefit, though not required, to put a 12” x 12” patio block under each of the wall joints. The patio block should be dug into the ground such that the top of the patio block is level with the top of the ground.
- Can I bring in fill dirt to raise the ground so it is level?
No, not usually. Fill material can wash away or settle over time allowing the pool to become out of level and thus unstable. When a pool becomes too far out of level it causes undue stress on the downward wall which will cause it to burst which could result in property damage, personal injury and/or death.
However, if fill must absolutely be done to raise the pool walls only a few inches, fill can be done provided it will not erode away and it is compacted to meet standard federal road grade compaction standards.
- How far can the filter system sit away from the pool?
Depending upon the filter system size and when using Schedule 40 piping it is possible for the filter system to be placed upwards of 30’ away from the pool. Further distances may require utilizing check valves at the filter system to allow for proper hydraulic start-up of the pump.
- How long do I need to run my pump-filter system during the swim season?
The filter system should run at a minimum to turn the water gallons over at least 2 – 3 times per day. Consult your pump and filter hydraulic flow rates to determine the time needed.
- How often should I backwash my filter?
A pool filter should be backwashed or cleaned when the baseline filter pressures rises 7 – 10 psi higher than the baseline pressure gauge reading.
- What do I need to do to my pool in the winter?
Common Steps for Winterizing a Swimming Pool. Here are some general in ground and/or on ground pool tips for winterizing a swimming pool. Swimming Pool winterization should only be done with great care and caution as serious bodily harm, injury or otherwise and/or property damage could occur.
Winterizing the pool perimeter plumbing
- Thoroughly clean your filter, usually a typical backwashing of the filter will do.
- Water lowered and kept about 6” below the skimmer throughout the winter
- You will need to have on hand rubber expansion plugs which fit all water inlet and outlet fittings for the pool. (Skimmers, Returns, Cleaner, Jets, etc.)
- An expansion plug is a tapered rubber plug which uses a large flat “washer” plate on top with a wing nut. When the wing nut is tightened it pushes the washer plate downward, expanding the plug and creating a seal.
- All water should be evacuated from the pools plumbing lines.
With the pump off, the multiport valve in the filter position and all pool system valves in the open position, this is a typical water evacuation (winterization) process. - Remove the drain plug from the front of the pump
- Attach an air compressor hose into the same threaded port on the front of the pump
- Usually the size of the pump port and an air compressor hose are the same, so adaptors may not be required
- Open the valve on the air compressor to allow the air to pass through the hose and into the pump as much as possible. The more air which passes through the system the fastest is most effective. The air compressor will usually turn on producing more air during this entire process.
- The skimmers will usually “blow” first, meaning that the water is pushed out of the lines, up through the skimmer and air is flowing out. To properly blow the line(s) out, the plug can be placed into the port for a few seconds and ONLY held in place, then removed. This will allow water to collect in the plumbing and more water to be evacuated. This is called “burping”. Once this is done, secure the plug in the port by tightening the wing nut until the plug is expanded as much as possible. Never let go of a plug or place your face or any body parts over the plug during this process.
- If there are no step jets or cleaner ports, the next port to blow should be the pool returns. Follow the same burping process, above.
- After all of the ports are plugged, the next to blow should be the main drains. Let the drains continuously blow air for a few minutes. Then simultaneously close the main drain valve and discontinue air to the filter system.
Winterizing the pool filter system
- Depress the multiport valve handle and rotate it to either “winterize” or position the handle so it is between any two locations and release the handle.
- Remove the drain cap from the bottom of the filter
- Remove the drain plugs from the front and side of the pump
- Remove any other drain plugs from other filter system equipment (heaters, cleaner pumps, etc.)
- Place the filter drain cap and pump plugs in the pump basket for the winter. That way you know where they are come spring time.
- Do on ground pools come as a single piece and I just ‘drop it’ in the ground?
On ground pools will arrive shipped on 1 or more pallets via common carrier (tractor trailer). They are individual steel wall panels that are bolted together at each end to make the pool wall frame.
- How do the pool walls get connected together?
On ground pool walls have bolt holes along the vertical side on each end of the steel panel. When the panels are placed side by side, a bolt is passed through and secured with a nut.
- How level do the pool walls need to be?
Once assembled the pool walls should be no more than ¼” out of level of any other panel when taking the elevation from the top of the pool wall.
- How can the pool wall elevation / height be adjusted once I’ve bolted all of the panels together?
If the wall is too high the dirt can simply be dug out from under the wall to lower it down. When doing this it is easier to do from inside the pool.
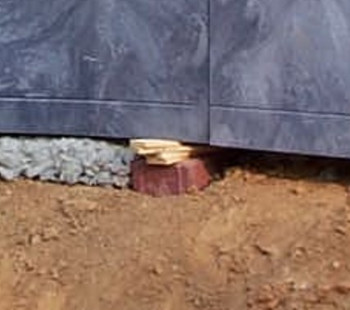
If the wall is too low a combination of bricks and shims can be used to elevate the wall to get to the ¼” elevation tolerance needed. The image below shows the use of a red brick and wood shims.
- When assembling the pool wall panels by bolting them together, do I need to make them level at that time?
When assembling the wall panels together it is not necessary to make sure each of them is at the proper level but they should be within a few inches of level as you go around the pool as this makes bolting them together much easier. Once all of the wall panels are bolted together, then using something like a laser level check the pool wall elevations.
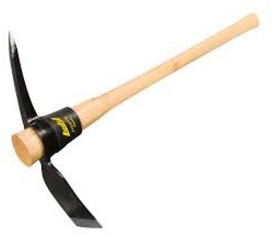
To raise the pool panel we’ve found it easiest to not try and lift the panel itself but using a lever to lift the wall. We use either a mattock or pic axe to lift the walls once assembled. This can be done from either the inside or outside of the pool. Usually whichever is the easiest for movement. We’ll use the mattock in this explanation. Place the pointed end of the mattock slightly under the pool wall with the handle pointing upward. Then with the flat side of the mattock on the ground pull away from the pool wall on the handle. This will cause the center of the mattock to act as a fulcrum and the pool wall will rise. While the wall is still elevated place the needed material under the wall to raise it. Adjust as needed.
Mattock shown below:
- Do the pool walls need to be plumb?
Yes. Using a 4’ level place one end on the inside bottom part of the wall and the other end going up the wall. Checking wall plumb, elevation and square are three different steps which will be done mostly in conjunction with one another.
- How do I tell if the panels are laying out correctly?
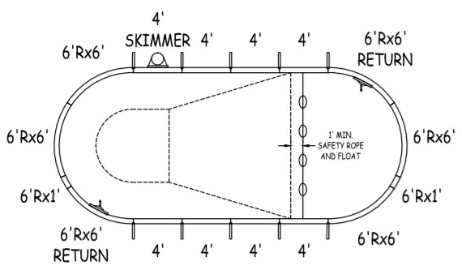
The pool wall panels should be laid out and assembled in the order which is on the pool wall panel lay out diagram for the pool kit. These are available on the Propools.com website for each size and shape pool in the ‘Resources’ tab on each of those pages. It is possible to change the layout order on some of the pool wall panels on some of the sizes and shapes. When doing this it would be best to consult someone with Propools.com to be certain the swapping of panels does not affect how the liner will fit in the pool.
Below is a sample of a pool wall layout diagram which also shows the top view of one of the pool bottom configurations available.
- Do I need to take ‘cross dimensions’ around the pool to make sure the pool walls are laid out correctly?
Yes. Cross dimensions are taken from different points around the pool and also from different points outside the pool as shown in the diagrams below.
Points A, B, C & D are the four corners of the virtual true rectangle which is set up outside of the pool. Notice how the dashed line from points A&D and B&C pass right along the enter end of the inside of the pool wall. As well does the dashed line from points A&B and C&D.
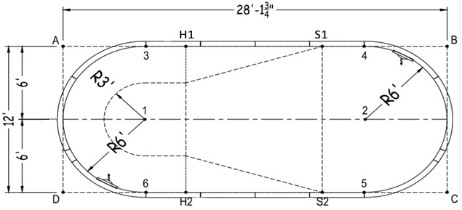
Below is the table of cross dimensions. Points A thru D are across the top and the other points are on the left hand side.
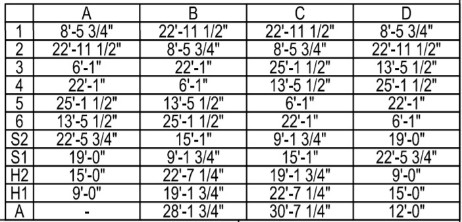
Brief example of point to point measurements:
- The Distance between point S1 and D should Be 22’ 5-3/4”
Points 3, 4, 5 & 6 are the ends of where the straight panels. The distance between points 3 & 5 should be the same as between points 4 & 6. Getting these four points located first will make getting the other points in place. Once points 3, 4, 5, & 6 are set try and secure those panels in place so they don’t move any more across the ground.
Once the pool is square and the walls are plumb, then it’s time to check for pool wall panel elevation. After the pool walls are at the correct elevation go back and verify the cross dimensions and the wall plumb. If the panels have to be moved across the ground then go back and check the pool wall panel elevations again. This will be a fine tuning process. Generally not a once and one process.
- Which way do the side buttresses go on the pool panel?
There are 2 mostly used types of side buttresses for on ground pools. Primarily used is the single piece, Triangle Buttress as shown below.
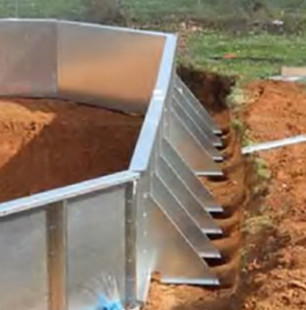
Triangle side buttresses which are secured with J-Bolts poured into an 8” hole as seen below.
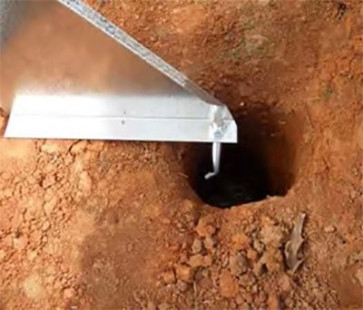
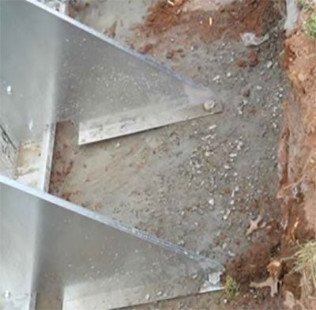
If you would like you can leave the steel buttresses exposed or back-fill around them, deck over them, etc.
When a step is put on the pool an A-Frame or Turnbuckle buttress is used and is installed as shown below.
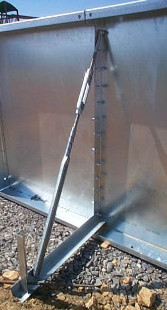
- The pool also has ‘turnbuckle braces’. How do I assemble and install the turnbuckle braces?
Below is a turnbuckle buttress attached to a steel panel. These are assembled in the field. The upper part of he turnbuckle should use the very top or 2nd from the top bolt holt to allow for maximum functionality.
- The bottom 90 degree angle piece which runs out horizontal from the pool wall should have the drive stake installed through the matching shape slot in the end.
- The turnbuckle which is at the top of the angled threaded rod can be tightened or loosened which will cause the pool wall or step to lean in or out. This is useful in getting the correct plumb.
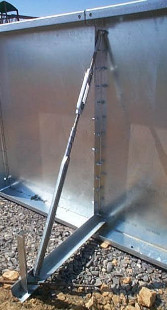
- Do all of the bolt holes where the panels join together have to be bolted?
Yes. For maximum pool wall assembly integrity all bolt holes where the panels meet each other should have a bolt passing through both panels and secured with a nut.
- Can the panels be cut to add an additional accessory like a light or pool return?
Yes. The steel panels can be cut provided there is enough steel material left to create a water tight seal for the fixture or accessory being added. The cut edge of the steel panel should be coated with a sealant to prevent long term degradation of the steel.
- Does anything need to be done on the inside of the pool where the walls join together?
Where the steel wall ends meet there is an indentation joint. This joint should be covered with 2 – 3 layers of duct tape. This will create more of a smooth surface for the liner to lie against when it is full of water. This should be done just prior to putting the wall foam or liner in the pool.
- What do the pieces of re-bar do?
Re-bar which comes with the pool kits can be used to drive through the bottom lip of the steel wall panel to hold it in place while the pool is being set up and also when a concrete footer is being poured to help ensure the pool wall does not move. Not all panels have a hole in the bottom lip for the re-bar. In these instances driving one re-bar just on the outside and just on the inside of the pool wall panel edge will have the same basic effect.
- Do the walls have to have a concrete footer on the outside of them?
Depending upon the shape of on ground pool purchased No. Below is a quick reference chart for determining if a concrete footer should be used.
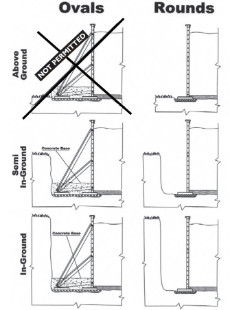
Round pools do not require a concrete footer. Oval pools require a concrete footer on the outside of the pool wall along the straight sides. Keyhole shape pools should have a concrete footer along the two long sides of the pool. This includes the straight wall and the first part of the radius end. Kidney shape pools should have a concrete footer along the long arching side of the pool. Except for round on ground pools, all should be installed in the ground at a minimum of 18”.
- How do I install the steps?
- Bricks Under Supports
- Bolting to Panels
- Concrete Footer
- What can the pool be back-filled with?
Backfilling around the on ground pools can be done using a ¾” gravel or similar size stone. It is possible to backfill with dirt though keep in mind dirt settles over time. When backfilling over around plumbing use a ¾” stone and carefully shovel stone under the pluming lines giving them a solid bed to lie on.
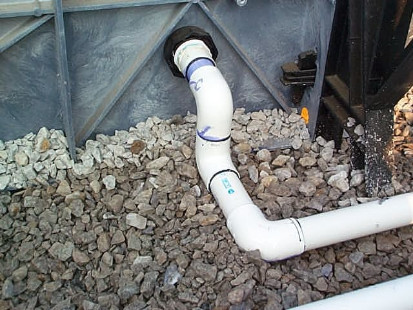
Then top add a 6” layer of the same stone on top of the plumbing lines for added protection. From there it is fine to top off with whichever material you think is best. Again, backfilling with dirt will settle and backfilling with sand has no compaction and sand may run out/off
- How high do I have to backfill?
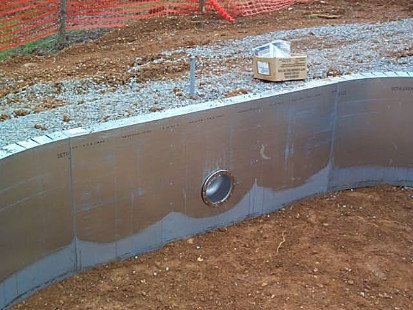
The best backfill is one that comes up to within 6” of the ground or just to the bottom of the lip at the top of the panel.
- How deep in the ground do the wall panels need to go?
On all pools except for the round on ground pools, the panels must be installed in the ground at a minimum of 18”.
- What type of plumbing should I use when plumbing the pool?
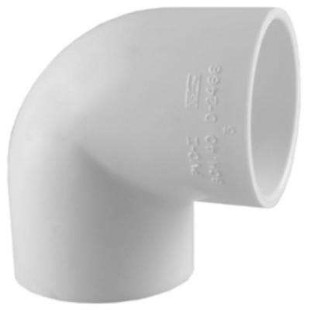
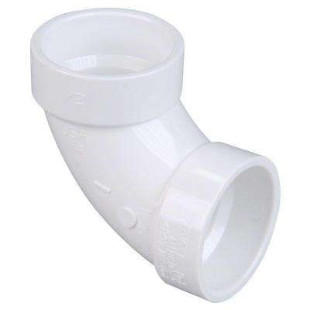
Schedule(SCH) 40 Rigid PVC piping and fittings should be used for the swimming pool perimeter plumbing as well as for the filter system on the filter pad. For some types of heaters Schedule 80 PVC piping may be required at the heater connections. Consult heater manual for specifics. DO NOT us Schedule 40 DWV pipe and fittings. DO NOT use drainage pipe or drainage fittings.
Below is an SCH 40 approved 90 degree elbow which should be used:
Below is a NON-approved 90 degree drainage fitting elbow which should NOT ever be used:
- How to best cut the pipe Propools recommends?
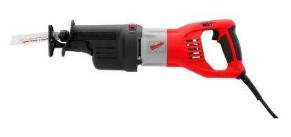
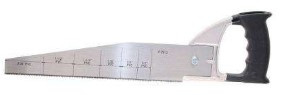
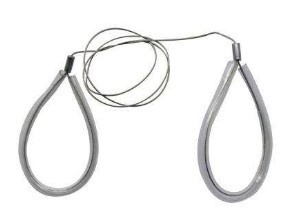
There are several tools that can be used to cut SCH40 piping. Such as:
- Cordless or corded reciprocating saw with a wood cutting blade
- Hacksaw with a metal cutting blade
- Pipe Saw
- Wire or Cable Saw
- Cordless or corded reciprocating saw with a wood cutting blade
- What type of glue and primer should I use when plumbing the pool?
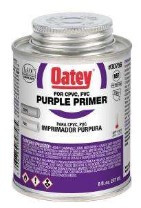
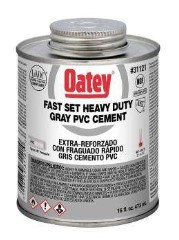
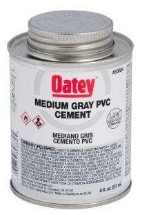
We always used Oatey glue and primer. No reason except that we’ve never had an adhesion failure when using it.
Primer:
Oatey Purple Primer – Get 1 – Quart
Glue:
Either Heavy Duty Gray or Blue Glue. Each have their own properties which make them better to use on one job versus another. Both a great glues though. Get 1 Quart of which ever one you desire. Both are ‘Hot’ glues and set extremely fast so you need to be ready to complete your connections quickly.

Though, if you still want a great glue that does not set up quite as fast try the Medium Gray blue. 1 Quart should be enough.
- What type of compound or material do I use when thread fittings together?
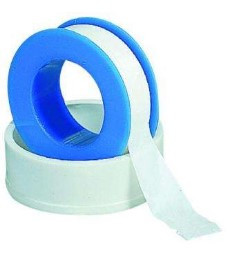
When threading fittings together on the filter system always and only use thread tape. Not a sealant compound such as Rectorseal. Just regular white Teflon Thread Tape.
- Do I have to put main drains in the pool?
Main drains are not required in pools but they are very beneficial for water clarity. Without main drains in a pool the water in the deeper end or lower part of the water on a flat bottom pool can become a little ‘stale’ due to its un-circulation. This may be visibly apparent as the deep end of the pool down near the floor may look a little hazy. Main drains can eliminate this by pulling water from the bottom of the pool. With main drains the water is being pulled from the pool in two different locations allowing for maximum water clarity.
There is one exception to this rule and that is the skimmer/return combination made by Hydra Pools. When a Hydra Aqua Genie Skimmer is placed in the proper location on the pool it will effectively do what a main drain is designed to do. These types of skimmers are only available on Hydra Inground Pool Kits.
- Why did I receive two main drains?
To minimize entrapment risk the Federal Government passed the Virginia Graeme Baker Pool and Spa Safety Act. In essence it states that when a floor drain system is used there must be a pair of them with a minimum distance between them. As such many manufactures now only sell their main drains in pairs. Read More…
- How is the pipe run from the main drains back to the filter system?
The piping from the floor drain is best run in a trench below the pool bottom material, under the pool wall and out to the plumbing ditch. If a concrete footer outside the pool wall is going to be poured, this should be done prior to pouring the concrete.
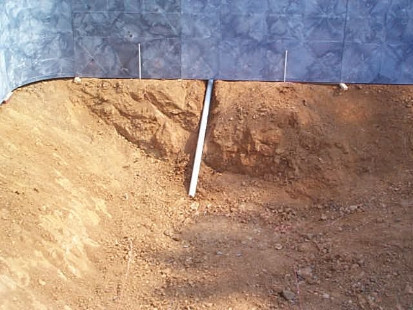
This is the main drain line stubbed through the wall. The main drain line should be stubbed through the wall prior to pouring the concrete footer on the outside of the pool wall.
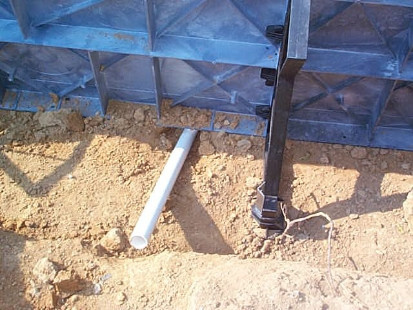
This is a 2-inch SCH 40 PVC pipe stubbed in underneath of the pool wall. Once the concrete footer is poured around the pool we will attach to this end of the pipe and run it back to our filter.
- When the plumbing is run around the pool, can it just lie on the dirt or should it be lying on something?
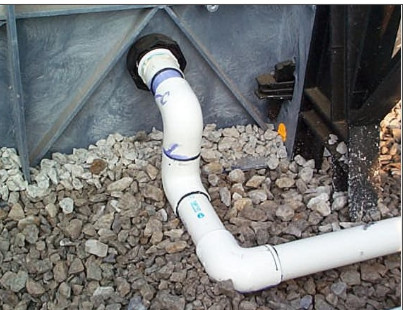
Plumbing lines can run across the dirt but it is not recommended because of inherent high and low spots in the dirt along with ground settling. This settling and movement can cause undue stress on the pipes or joints which may over time cause a leak.
Instead we recommend a 6” bed of ¾” gravel or similar type material be put down in the plumbing ditch and the plumbing run across the top of it. Prior to backfilling with more grave/stone over the plumbing always fill in any space/voids under the plumbing lines.
- How do I plumb the filter system?
There is no specific industry standard for plumbing a filter system and almost all of them are actually plumbed slightly different. Though, the order in which water flows through the system is consistent. The most basic of filter system will have a hydraulic flow similar to this:
- Water is sucked in through the front of the pump, pushed out of the pump from the top.
- Then the water is pushed through the filter.
- Water comes out of the filter
- Water goes into the chemical unit (if installed)
- Water comes out of the chemical unit and back to the pool.
If additional accessories such as an automati